wee intro – This guide’ll be pretty straight forward and assumes you:
- already have permitted access to the Stripe and/or PayPal account/s you’ll be connecting to this plugin (test mode is recommended for initial setup). If you don’t have a Stripe and/or PayPal account yet – have a peep at Stripes getting started docs and/or PayPal’s sign up page
- you have admin access to your WordPress site
Both licenced and lite version plugin users can follow this guide to setup and you’ll want WordPress 6.3+ and PHP 8.0+ required as minimum for each.
0 you need to get the plugin
Pro plugin + license
If you’re looking to get the Pro license (and why wouldn’t you? It’s a great deal and a single one off payment instead of another sub! 🙂↕️✨),
- head over to the licences page pick from a x1, x5 or unlimited site installs licence and complete your purchase.
- Then check your email for your licence key (
EEWD-XXXX-XXXX-XXXX-XXXX) and download link for the Pro version plugin - Download the Pro version and upload the
.zipto your site via WordPress admin dashboard Plugins ➡️ Add New ➡️ Upload Plugin - Activate the newly uploaded plugin!
Free plugin
Not ready to commit? No problem, the lite plugin version includes subscription forms & subscription management, no license required.
- Download the free Lite version from WordPress.org directly
- or search “eew Subscriptions” in your WordPress admin dashboard from Plugins ➡️ Add New ➡️ “eew Subscriptions”
- If downloaded from WordPress.org directly, upload the
.zipto your site via WordPress admin dashboard Plugins ➡️ Add New ➡️ Upload Plugin - Activate the newly uploaded plugin!
1 enter your licence key
Pro only
- Go to Dashboard nav ➡️ EEW Subscriptions 1 ➡️ Settings 2 ➡️ Licence tab 3
- Paste your key 4 and click Activate Licence 5
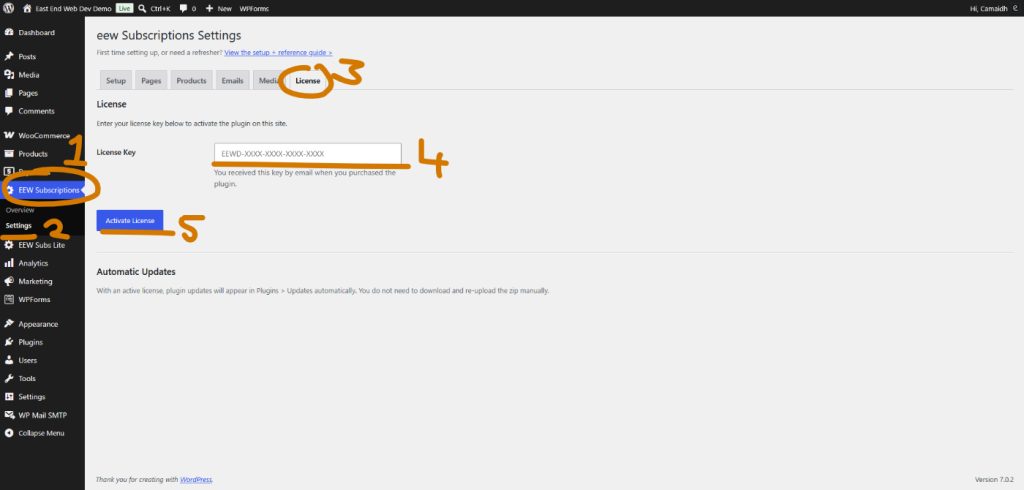
- Confirm the status badge shows Active
2. connect Stripe and/or Paypal creds
Connecting Stripe
- Go to:
Pro – Dashboard nav ➡️ EEW Subscriptions ➡️ Settings ➡️ Setup tab ➡️ Stripe API Keys
Free – Go to Dashboard nav ➡️ EEW Subs lite ➡️ Stripe API Keys - Enter your Stripe Publishable Key and Secret Key found in the API keys sidebar section 1 on your Stripe dashboard
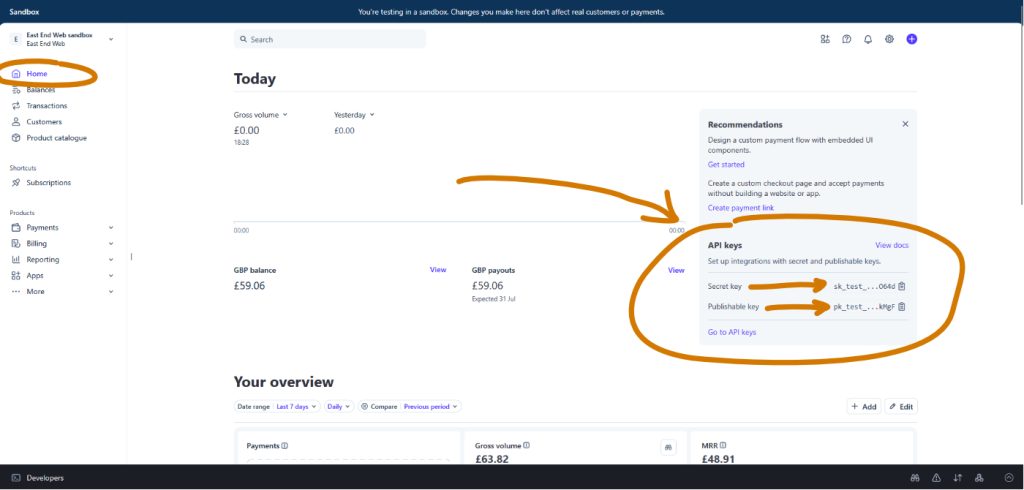
Use test keys (pk_test_ etc.) until you’re ready to go live, at that point use live keys(pk_live_ etc.)
Live secret keys can only be revealed once so make a copy, or create a new secret (+ invalidate the old) on each new entry.
- Set your currency (e.g. GBP)
- Ensure that ‘Stripe’ is checked ✅in the ‘Which payment vendors are offered to customers’ section.
- Save settings
Connecting PayPal
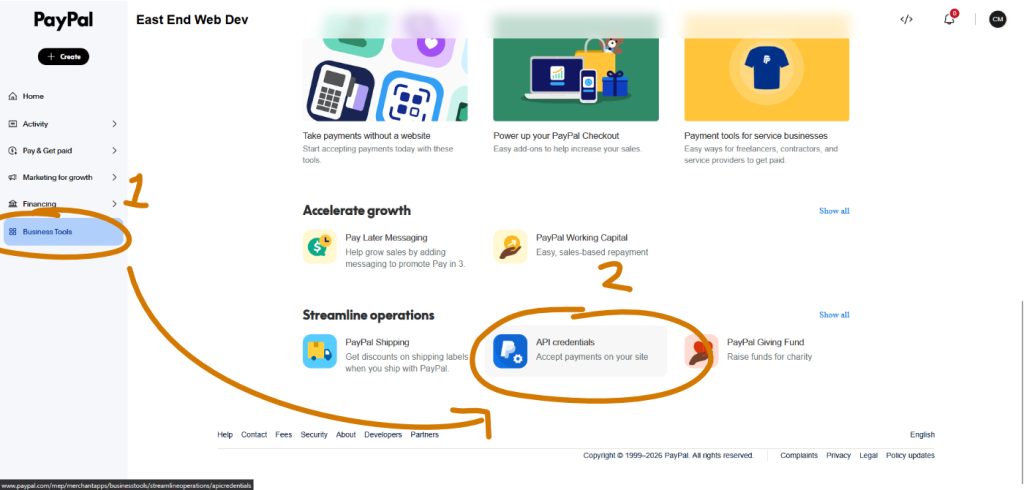
- In your PayPal account dashboard, click on ‘Business Tools’ 1 in the main navigation
- Scroll down to the ‘Streamline operations’ section and click on ‘API credentials – Accept payments on your site’ 2
- Click the ‘Get Started’ button for ‘API Credentials’. This will take you to PayPal’s Developer area/dashboard.
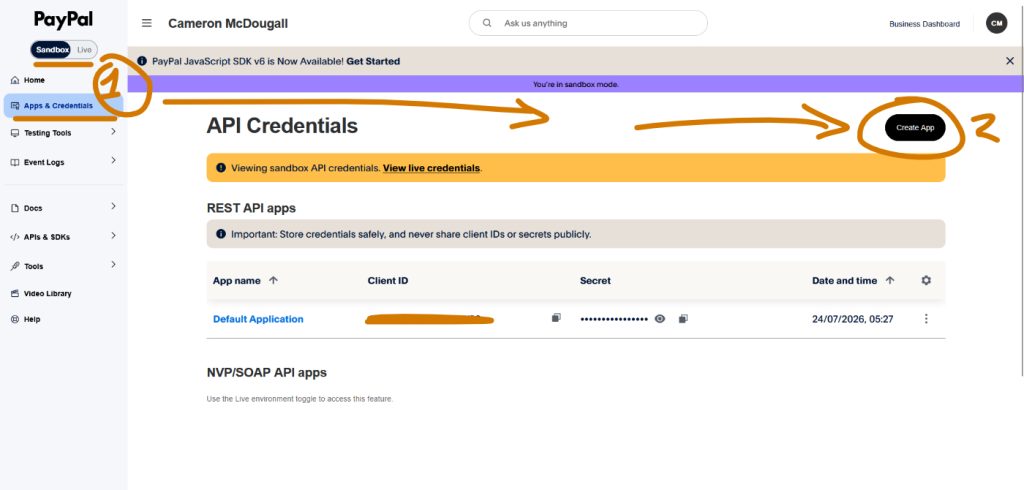
- In the navigation, select ‘Apps & Credentials’ 1 if not already there. 1 Note the Sandbox / Live mode switch for you PayPal account here
- Select ‘Create App’ 2 to create a new PayPal webapp connection.
- In the ‘Create App’ window that opens, add a label for this connection in the ‘App Name’ field
- Ensure the App Type is set to ‘Merchant – Accept payments as a merchant (seller)’
- Ensure you have the right live/sandbox account selected in the account dropdown selector
- Click ‘Create App’. You will now be directed to your PayPal webapp detail view where you can find your Client ID 1 and Secret Key 2 under the API credentials heading.
Keep this page/tab open!
You’ll need it in a moment and for step 3 of this guide.
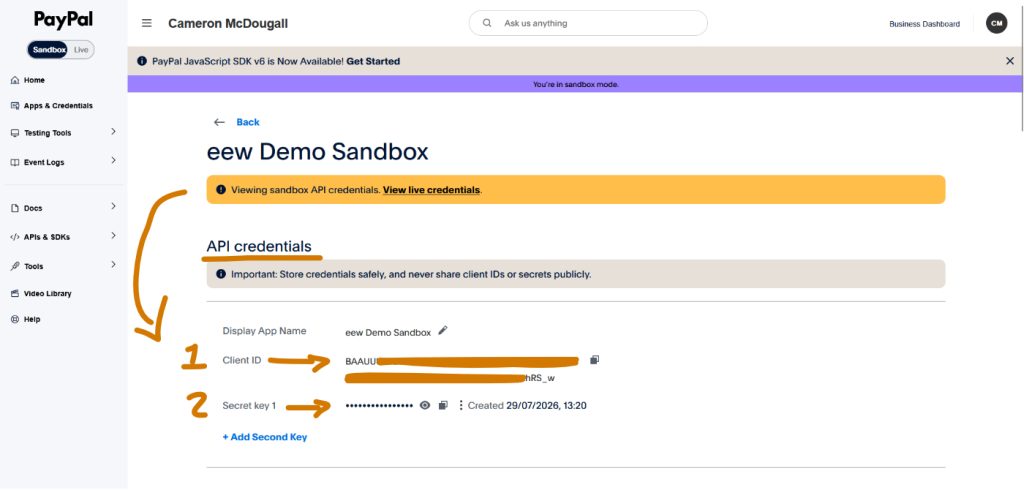
- In your WordPress site dashboard go to:
Pro – Dashboard nav ➡️ EEW Subscriptions ➡️ Settings ➡️ Setup tab ➡️ PayPal API Credentials
Free – Go to Dashboard nav ➡️ EEW Subs lite ➡️ PayPal API Credentials - Enter the Client ID and Secret Key 1 found on your Stripe dashboard (make sure to avoid copy/pasting any ‘ ‘ blank spaces at the end of your keys).
- Set the Live / Sandbox dropdown to match the mode you created your PayPal webapp in.
- Ensure that ‘PayPal’ is checked ✅in the ‘Which payment vendors are offered to customers’ section.
- Save settings
3 create + connect the webhook
Stripe webhook create + connect
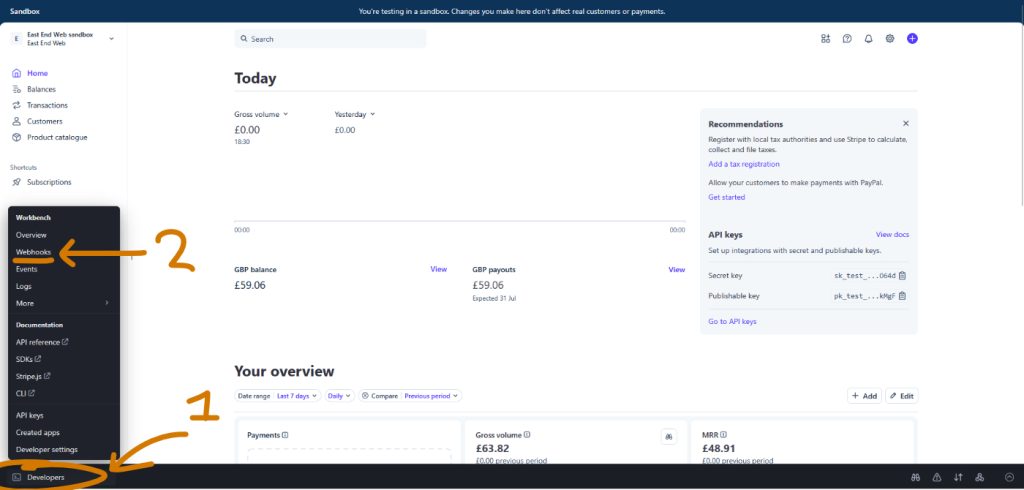
- In your Stripe Dashboard ➡️ Developers 1 (often down the bottom) ➡️ Webhooks 2, click Add endpoint/destination 3
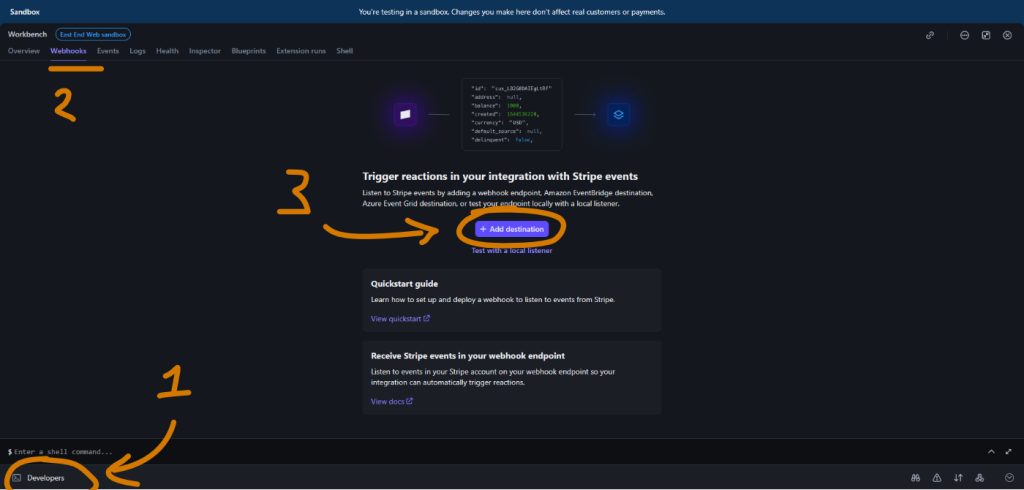
- For ‘Event destination scope’ select ‘Your Account’ (likely already selected) and use the default set API version.
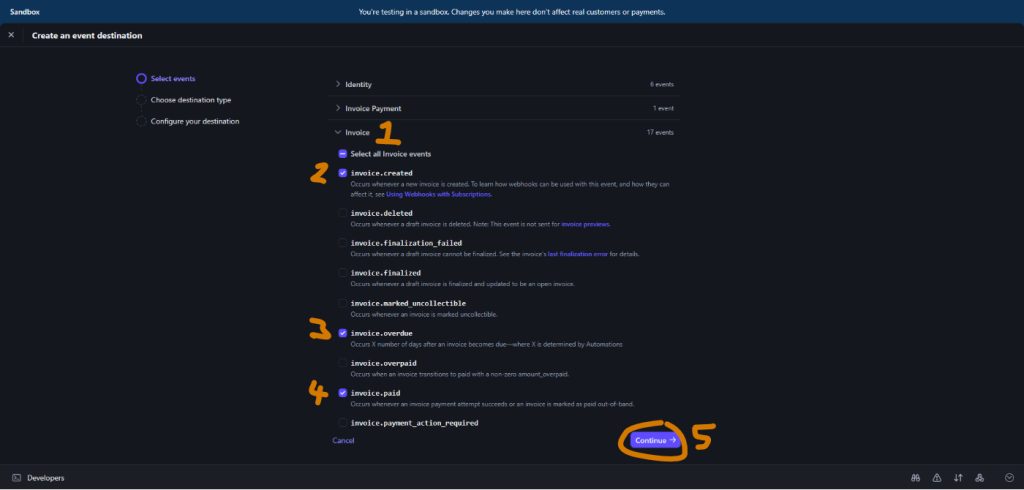
- Scroll down to the ‘Events’ heading and select the following events within each 3 categories here:
- 🔽
Customercustomer.subscription.createdcustomer.subscription.deletedcustomer.subscription.updated
- 🔽
Invoice1- 2
invoice.created - 3
invoice.overdue - 4
invoice.paid invoice.payment_failed
- 2
- 🔽
Payment Intentpayment_intent.(Pro only)payment_failedpayment_intent.succeeded(Pro only)
- 🔽
- then select Continue ➡️ 5
- For ‘Choose where you want to send events’ select ‘Webhook endpoint’ and Continue ➡️
- Set the ‘Destination name’ field 1 to label this webhook endpoint (basically just a label for your management)
- Set the Endpoint URL field 2 value to:
Pro –https://{{ your site url here }}/wp-json/eew-subscriptions/v1/webhook
Free –https://{{ your site url here }}/wp-json/eew-subscriptions-lite/v1/webhook
and then Create Destination 3
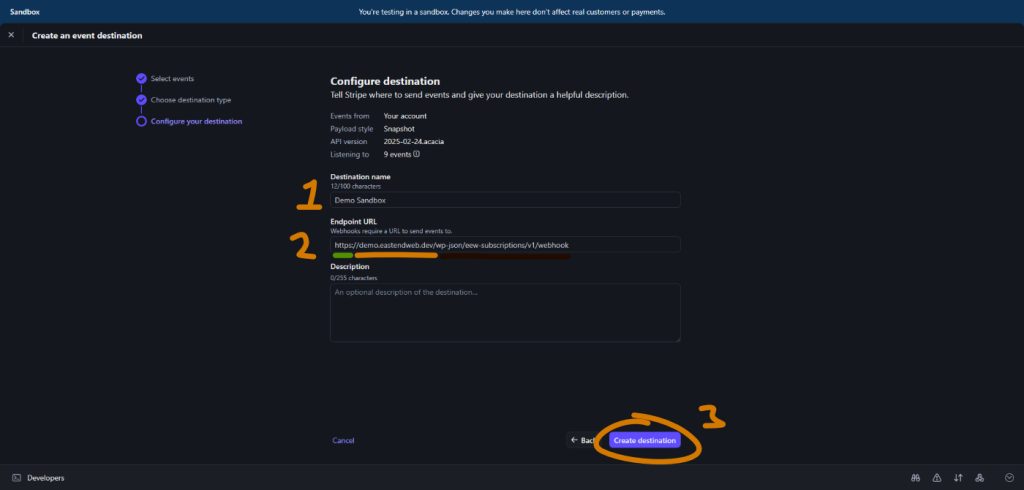
- Once created and directed to the webhook detail view, click on the eye icon 1 to reveal and allow you to copy the Signing Secret 2 (
whsec_...) to paste it into:
Pro – Dashboard nav ➡️ EEW Subscriptions ➡️ Settings ➡️ Setup tab ➡️ Stripe API Keys
Free – Dashboard nav ➡️ EEW Subs lite ➡️ Stripe API Keys. - Save settings
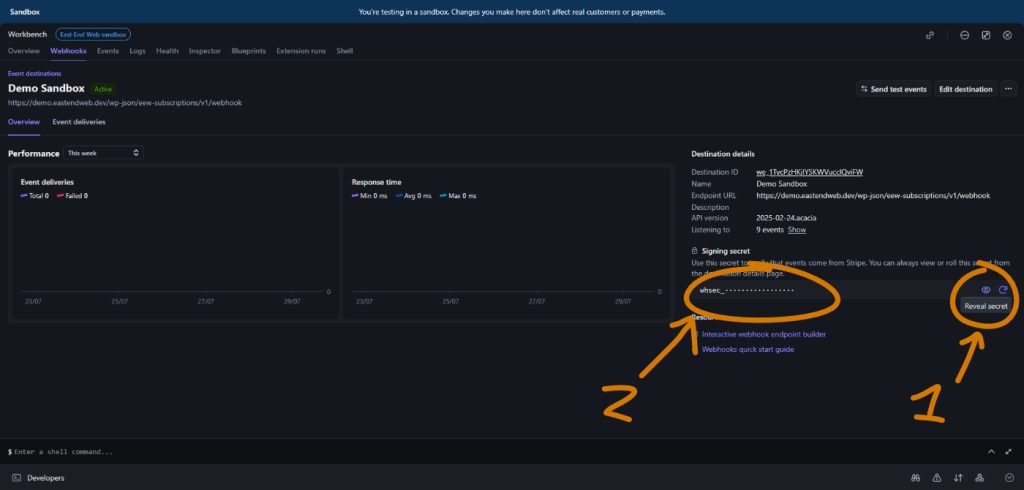
The Signing Secret can be found at Stripe Dashboard ➡️ Developers (often down the bottom) ➡️ Webhooks ➡️ Select the newly created desitination ➡️ Destination details
PayPal webhook create + connect
If you still have the PayPal webapp detail view page/tab open from step 2, skip this bordered block below.
- In your PayPal account dashboard, click on ‘Business Tools’ 1 in the main navigation
- Scroll down to the ‘Streamline operations’ section and click on ‘API credentials – Accept payments on your site’ 2
- Click the ‘Get Started’ button for ‘API Credentials’. This will take you to PayPal’s Developer area/dashboard.
- In the navigation, select ‘Apps & Credentials’ if not already there. Set the Live/Sandbox toggle to the mode your webapp was made in.
- Select your webapp to connect in the ‘REST API apps’ section to load the PayPal webapp detail view.
- Scroll to the bottom of your webapp’s detail view until you the the ‘Sandbox Webhooks’ heading 1. Click ‘Add Webhook’ 2
- Set the ‘Webhook URL’ field 3 value to:
Pro –https://{{ your site url here }}/wp-json/eew-subscriptions/v1/webhook
Free –https://{{ your site url here }}/wp-json/eew-subscriptions-lite/v1/webhook
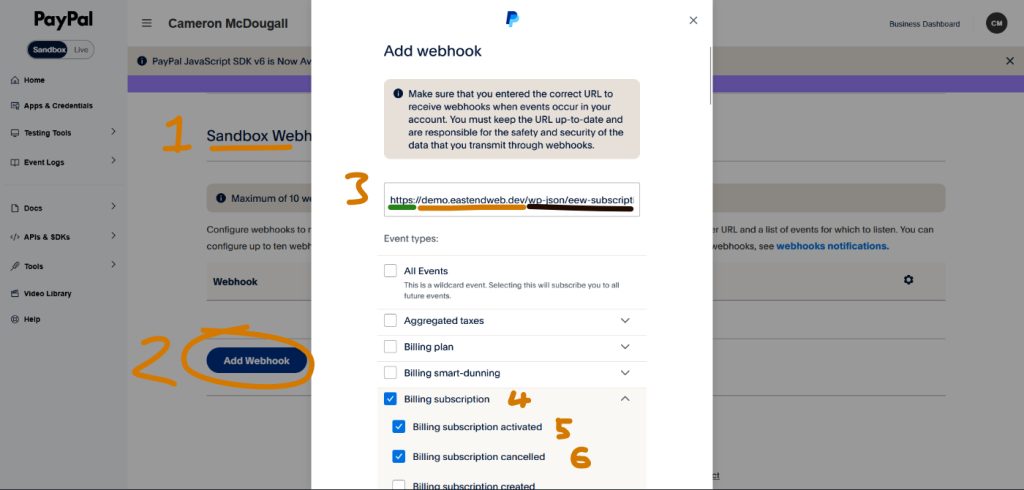
- In ‘Event Types:’ select the following events within each 2 categories here:
Billing subscription4 🔽Billing subscription activated5Billing subscription cancelled6Billing subscription expiredBilling subscription suspendedBilling subscription updated
- Payments & Payouts 🔽
Payment capture completed(Pro only)Payment capture denied(Pro only)Payment sale completedPayment sale denied
- Press ‘Save’ down the very bottom of the popup window list to create the webhook.
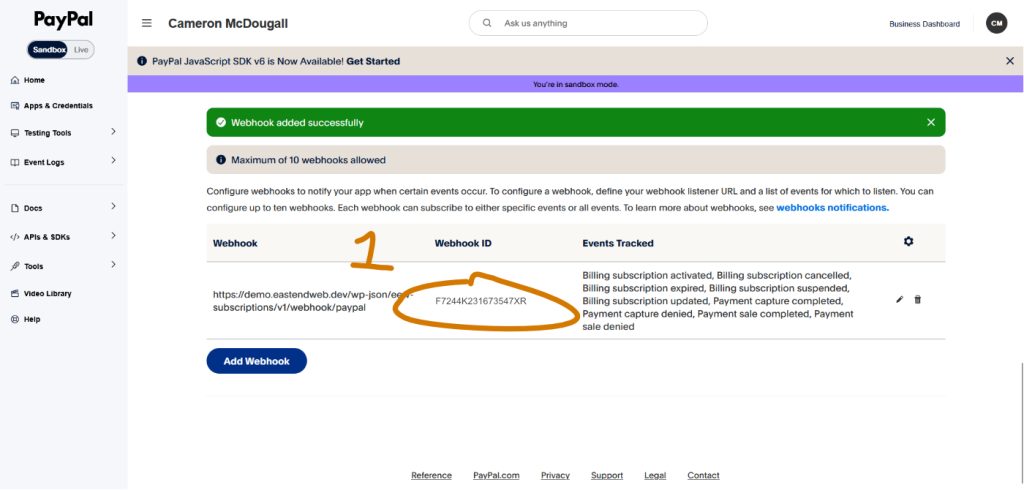
- Once created copy the Webhook ID 1 and paste it into:
Pro – Dashboard nav ➡️ EEW Subscriptions ➡️ Settings ➡️ Setup tab ➡️ PayPal API Credentials.
Free – Dashboard nav ➡️ EEW Subs lite ➡️ PayPal API Credentials. - Save settings
4 add your products
Stripe add product
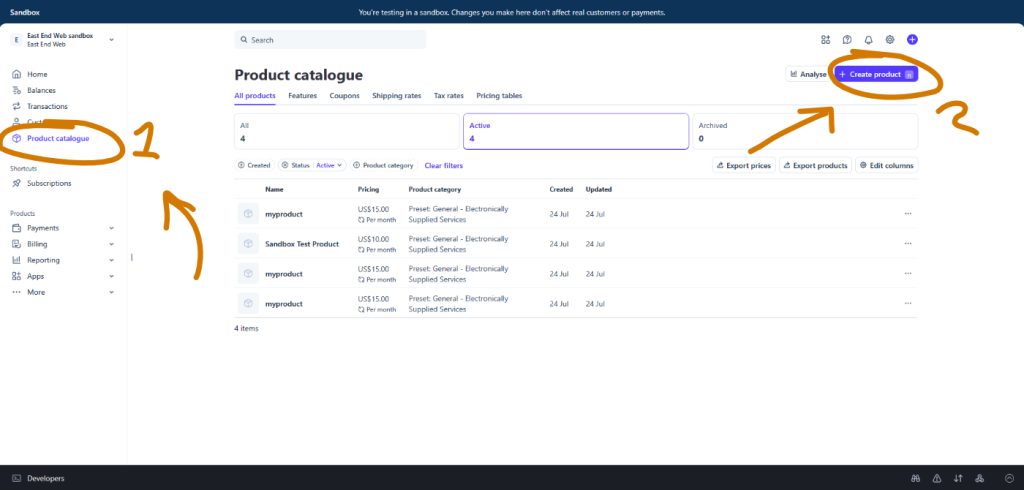
- Back in your Stripe Dashboard and go to Product catalogue 1 ➡️ + Create product 2
- Fill in the details:
- Under Pricing, click Add a price and configure:
- Pricing model – select Recurring
- Amount – e.g.
£9.99 - Billing period – Monthly / Yearly / Weekly / Custom
- Currency – must match the currency set in the plugin
- Click Save product
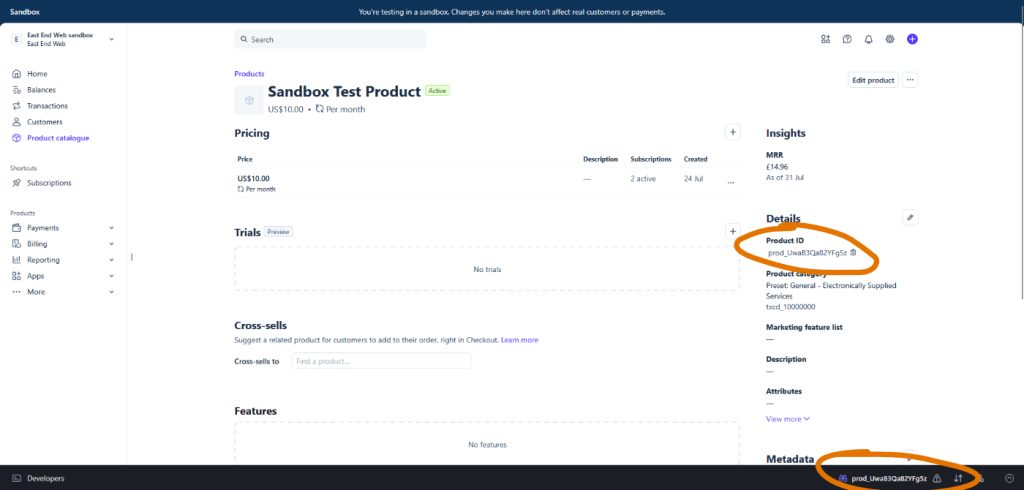
- On the product detail page, copy the Product ID, it starts with
prod_(e.g.prod_ABC123). You’ll need this in the next bit.
- In your WordPress admin dashboard go to:
Pro – Dashboard nav ➡️ EEW Subscriptions ➡️ Settings ➡️ Products tab.
Free – Dashboard nav ➡️ EEW Subs lite ➡️ Products heading.
- Fill in the row that appears:
- Product ID 1 – paste the
prod_... IDfrom Stripe - Label 2 – the display name customers will see on the subscription form (e.g. Monthly Hosting).
- Subscribe Page 3 (optional) – select the WordPress page that contains the
[eew_subscription_form]shortcode or /eew Subscriptions block for this product. If set, this is where the “Subscribe to view” notice will customers. - If a subscription product has multiple prices/triers, add a tier label 4 and price ID 5 of each tier. (6 is for equivalent PayPal price)
- Product ID 1 – paste the
- Repeat for each product
- Click Save Changes
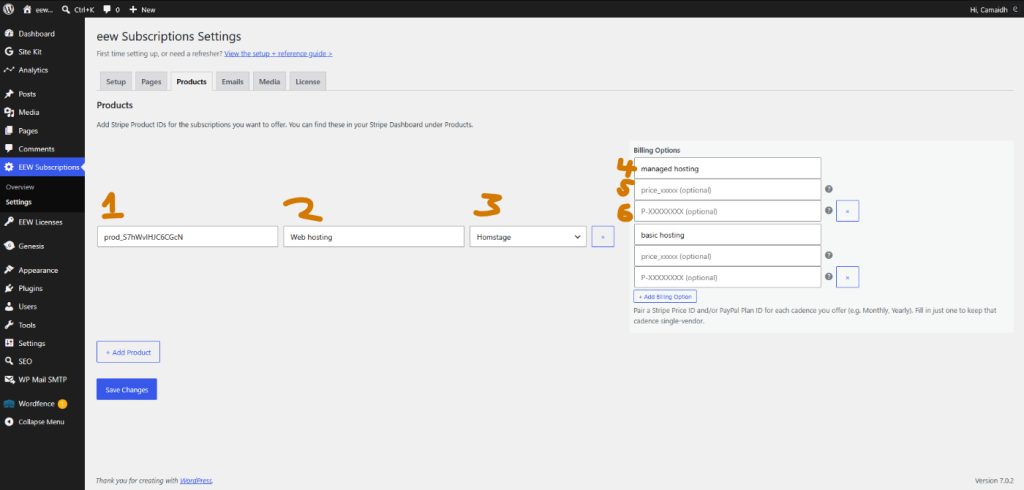
Note: A subscribe page per product is optional, if left blank the plugin falls back to the default subscribe page set under the Pages tab. If you only have one subscription form for all products, setting the default is sufficient.
PayPal add product / plan
Double check you’re back in your regular PayPal dashboard for this step and not your developer PayPal dashboard from step 3
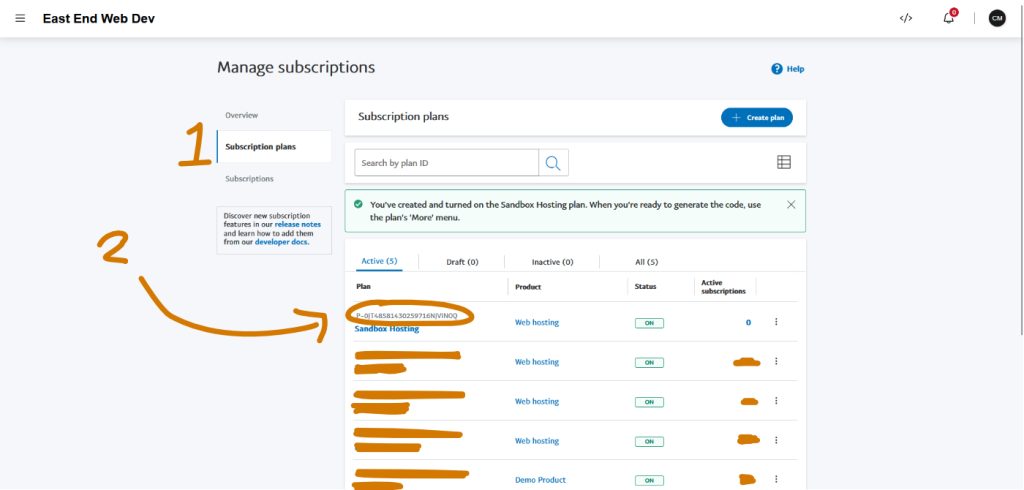
- Back in your PayPal Dashboard go to Pay & Get paid ➡️ Subscriptions
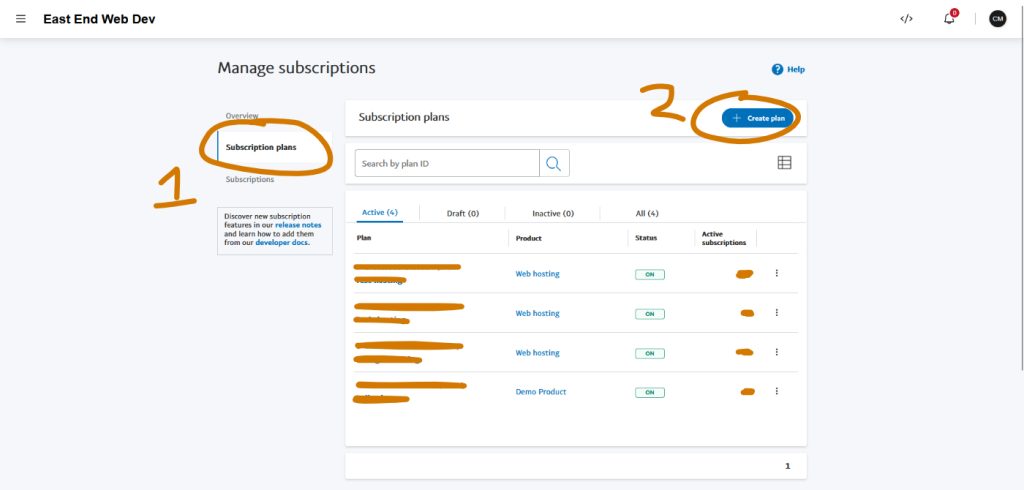
- Click on Subscription plans 1 ➡️ + Create plan 2
- Ether select an existing Subscription Product to house this Plan within, or create a new one filling out the relevant fields. Click Next.
- Select ‘Fixed price’ and click Next.
- Enter a name for this Plan and an optional description and click Next.
- Fill out the ‘Define pricing for this subscription plan’ step as is relevant to your subscription model. Click Next.
- Review your Plan and if you’re happy with all, click ‘Turn Plan On’ at the bottom of the review panel.
- Your plan is now accessible in Pay & Get paid ➡️ Subscriptions ➡️ Subscription plans 1. Copy the Plan ID 2
- In your WordPress admin dashboard go to:
Pro – Dashboard nav ➡️ EEW Subscriptions ➡️ Settings ➡️ Products tab.
Free – Dashboard nav ➡️ EEW Subs lite ➡️ Products heading.
- Fill in the row that appears:
- Product ID 1 – not needed for PayPal, this is Stripe only
- Label 2 – the display name customers will see on the subscription form (e.g. Monthly Hosting).
- Subscribe Page 3 (optional) – select the WordPress page that contains the
[eew_subscription_form]shortcode or /eew Subscriptions block for this product. If set, this is where the “Subscribe to view” notice will customers. - For each Plan in a Subscription Product, add a tier label 4 and then paste the Plan ID 6 of each tier. (5 is for equivalent Stripe price)
- Repeat for each product
- Click Save Changes
Note: A subscribe page per product is optional, if left blank the plugin falls back to the default subscribe page set under the Pages tab. If you only have one subscription form for all products, setting the default is sufficient.
5 create necessary pages
- Create a WordPress page for each of the following and add the relevant shortcode
| Page purpose | Shortcode | Block |
|---|---|---|
| Subscription signup | Pro: [eew_subscription_form]Free: [eew_sub_lite_subscription_form] | /eew Subcription Form |
| One-off payment (Pro plugin only) | Pro: [eew_payment_form amount=”4900″ currency=”gbp” description=”…”] | /eew Payment Form |
| Manage subscriptions | Pro: [eew_manage_subscriptions]Free: [eew_sub_lite_manage_subscriptions] | /eew Manage Subscriptions |
- Once all of above are created go to:
Pro – Dashboard nav ➡️ EEW Subscriptions ➡️ Settings ➡️ Pages.
Free – Dashboard nav ➡️ EEW Subs lite.
assign each created page to its corresponding role (Note a specific page for One-off payments doesn’t need to be assigned like subscription pages do). - Hit Save Changes.
6 restrict content to subscribers (optional)
Pro only
- For full page/post restriction – on any post or page, find the eew Subscriptions meta box in the editor sidebar via Page/Post tab (not Block tab) on right hand side ➡️ Subscription Restriction, select the required product, and save. Non-subscribers will see a “Subscribe to view” notice instead of the content
- For block specific content restriction – place a /eew Subscriber Content block in your page and then place the blocks/content only subscribers of a certain product can see inside of that. Don’t forget to specify which subscriber products a user must be subscribed to in the the Block tab of the editor sidebar under Restriction Settings ➡️ Required Products ➡️ Toggle on/highlight one or multiple subscription products
- For media file restriction – in your Media Library, select any file and find the Subscription Restriction field in the attachment panel (either via the Media modal or the full attachment edit page). Select the required product(s) and save. The plugin will:
- Move the file to an obscured, protected directory and write a deny-all
.htaccessto block direct URL access at the server level - Replace the file URL site-wide with a REST proxy endpoint that checks the visitor’s active subscription before serving the file
- Show a placeholder image to non-subscribing visitors (for images), or return a 403 for all other file types
- Block the WordPress image editor on restricted files to prevent circumvention via edit screen
Notify the original file uploader by email if another admin removes the restriction The Media Library list view shows a Restriction column so you can see at a glance which files are gated and to which products.
Note: Direct URL blocking works automatically on Apache via.htaccess. On Nginx the obscured directory name provides strong protection, but for full server-level blocking an additional Nginx location rule may be needed.
- Move the file to an obscured, protected directory and write a deny-all
7 test the flow + go live
test
- Use a Stripe test card or a PayPal test card to complete a test subscription or payment
- Verify a WP user account is created for the customer
- Check the Manage Subscriptions page loads correctly once logged in
- Confirm webhook events land on you WP site by checking the ‘Last webhook’ value in the EEW Subscriptions – Setup & Health widget found on your site’s admin dashboard.
go live
- In your Stripe / Paypal dashboard, switch from Sandbox mode to Live.
- You’ll now need to Replace the test Stripe / Paypal keys with live keys in Settings and recreate a webhook for Stripe / Paypal and your products for this live environment (worth re-reading these docs again to keep things right).